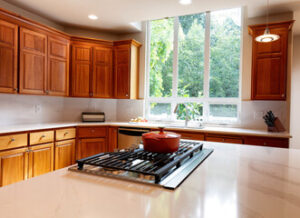
Cabinet Refinishing San Jose CA is an affordable and effective way to give your cabinets a facelift. It is ideal for homeowners looking to transform their kitchen without a full remodel.
Refinishing involves sanding down the surfaces of your existing cabinets, and then applying new stain or paint. It is not suitable for cabinets that are made from laminate or thermofoil.
If the cabinets’ existing finish is in good condition, stripping may not be necessary. In this case, a thorough cleaning and light sanding may be enough to prepare them for painting. This approach is a cost-effective alternative to fully replacing the cabinet doors and drawers, which can be an expensive undertaking. It also avoids the messy and dangerous process of chemically stripping, a task that requires strong chemical solvents and meticulous scraping.
When refinishing cabinets, the goal is to change their appearance without altering their structure or design. A surface-only refurbishment will not last as long as a complete replacement, but it can still offer years of stylish functionality and attractiveness.
Even high-quality paint jobs can begin to look shabby after about five years, especially in a busy kitchen. The wear and tear from holiday feasts, weekday chaos, and everything in between will eventually leave their mark on the surface of your cabinets.
A new coat of paint is a quick and affordable way to give cabinets a fresh, updated look. Choose a flat, eggshell, or semigloss finish that suits your style and color palette. A fresh coat of paint also gives you the option of using new hardware, which can make a big impact on the overall look of your cabinets.
Refacing cabinets is more expensive than refinishing, and it involves removing the cabinet doors, hinges, and handles, sanding down the existing structure, and installing a new veneer or wood surface. However, it’s a great option if your cabinet boxes are in excellent shape but the doors and drawer fronts have become scratched or chipped.
Before you apply any stain, a thorough cleaning is essential. This can be done with a degreasing cleaner, which will also help the wood adhere to the new finish. After cleaning, a light sanding with 320-grit sandpaper will smooth the wood and create an ideal surface for priming and painting. A premium primer should be used, as it offers better adhesion and will last longer than low-quality products. It also provides a sealer that can be used to fix any minor scratches or blemishes in the wood, which will prevent them from showing through the final product.
Repair Damaged Areas
Cabinets are subject to a lot of wear and tear over time, from kids banging on them to spills staining the insides of cabinets. But water damage can also be an issue, causing wood surfaces to swell and warp, and even leading to mold growth. If you’re experiencing these issues, or if your cabinets are starting to look more like a horror movie than a dream kitchen, it’s time to take action and restore the beauty of your cabinets.
The first step in repairing your cabinets is to dry them out thoroughly and assess the extent of the damage. You may need to replace sections of the cabinet that are irreparable due to extensive water damage. You’ll also need to repair any areas where the wood is rough or peeling. Use sandpaper to smooth the areas, alternating between coarse and fine grits for an even finish. Once the area is smooth, wipe away any remaining moisture stains with a damp cloth.
Once the surface is clean and dry, it’s important to seal the cabinets. This will help to protect them from future moisture damage, and it will make the new stain or paint go on smoothly. Choose a waterproof sealant that matches the color of your cabinets. Once the sealant dries, wipe the cabinets down with a cloth to remove any dust or debris that has accumulated.
If you’re planning to refinish the cabinets, you’ll need to inspect them for signs of mold and mildew. These issues are common in areas with water damage and high humidity, and they can cause health problems if not addressed quickly. Look for black, green, or white spots, and pay special attention to hidden areas like behind cabinet backs and drawers.
If you’re not interested in refinishing your existing cabinets, you can opt for cabinet refacing instead. This process is more extensive, but it offers a fresh new design that can completely transform your kitchen. With refacing, you can choose from hundreds of modern finishes and door styles to create a new look that complements your home.
Seal the Surface
Cabinets are subject to a lot of abuse and can become damaged over time. They need to be regularly cleaned to remove dirt and smudges from spills, water rings, or food stains and should be sealed with a quality wood sealer to protect the finish and prolong its lifespan. Moisture should also be kept to a minimum; if it is allowed to remain on wood surfaces for too long it can cause warping and other serious damage. It’s a good idea to keep moisture-rich materials, like towels and dishes, away from cabinets.
Regardless of whether you’re staining or painting your cabinets, it’s a good idea to apply a coat of primer. This will help the topcoat adhere to the surface and provide a smooth and even finish. A high-quality primer, such as KILZ 3, will offer superior adhesion and stain-blocking properties. It will also dry quickly and have low odor, which makes it ideal for use in kitchens.
After applying the primer, lightly scuff the cabinet surfaces and wipe them down again to ensure they are completely clean. This will improve the finish’s adhesion and eliminate any sheen. Ideally, you should apply multiple coats of primer and wait for each to dry completely before proceeding to the next step.
Before you paint your cabinets, it’s important to mask off areas where you don’t want to work, such as the handles and hinges. This will prevent the paint from accidentally splattering onto any other surfaces and make the job a lot easier.
Once the cabinet surface is properly prepped and sealed, it’s a good idea to caulk any gaps between the cabinets and walls or crown molding. This will prevent the gap from becoming wider over time, which can lead to cracking and water leaks. Gaps can also be entry points for pests such as insects and rodents, so caulking them can help keep your home safer as well. Use a silicone-based caulk for best results. This type of caulk dries with a flexible and durable finish that will not crack or peel.
Paint or Varnish the Cabinets
Cabinet refinishing is not as dramatic as refacing, but it can still make a big difference in the look of your kitchen. It involves sanding and applying a new finish, either paint or varnish. To get the best results, you should take your time and follow the proper steps. This will ensure that the job is done correctly and that it lasts.
Sanding the cabinets is a crucial step in the process, but it doesn’t have to be extensive. Use a medium-grit sanding sponge or 180-grit sandpaper on a random orbital sander to remove any flaking and give the surface “tooth.” After sanding, you’ll want to vacuum and tack the cabinets before moving on to the painting or staining process.
When refinishing wood cabinets, it’s important to choose the right stain. There are a variety of colors and finishes to choose from, so you can find the perfect match for your home. When choosing a color, consider your kitchen’s overall style and look at your existing furniture and appliances to determine what would match best. If you’re unsure, consult with a professional. They can help you decide on a color and provide recommendations for application techniques to achieve the desired effect.
If you’re painting your cabinets, apply at least two coats of the desired color. Allow the first coat to dry before applying the second. You’ll want to sand between each coat of paint to ensure that the surface is smooth and even. It’s also a good idea to use a fine-bristled brush to minimize the amount of overspray and make it easier to cover larger areas in one pass.
If you’re revarnishing your cabinets, start with a high-quality polycrylic. This product dries quickly and has little to no odor, so you can continue using your kitchen while the cabinets are drying. Once the final coat of varnish dries, it’s time to reattach your hardware and enjoy your newly-refinished cabinets. To keep your cabinets looking beautiful, periodically reapply the polycrylic coating as needed. This will keep the cabinets protected and shiny, and it’s easy to do at home with minimal mess.